Salvage tile
Started: 2020-07-31 21:28:32
Submitted: 2020-07-31 22:54:01
Visibility: World-readable
In which the intrepid narrator salvages tile from the shower construction debris and installs it on the wall
I tiled on the inside of my shower, and then I had to figure out what to do with the base of the partition wall above the tub.
I came up with the idea of matching the tile along the existing wall by salvaging tile from the demolition of the shower, then installing it (one tile at a time) above the tub, so it would look like the tile belonged there all along, tying together the existing wall (where I wasn't willing to remove and reinstall the tile, because that would unacceptably increase the scope of the project) with the new partition.
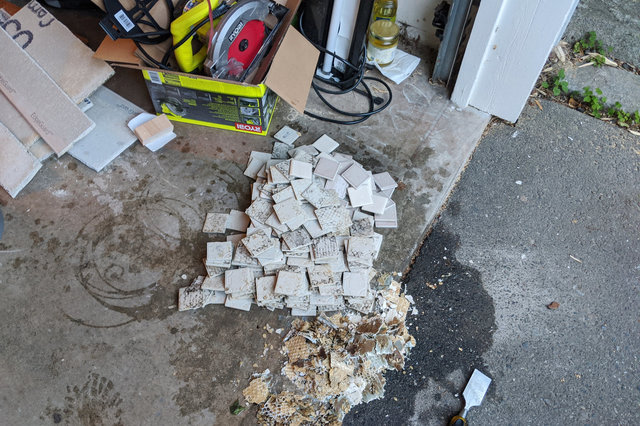
I left all of the demolition debris in the corner of my garage, so I rummaged through the bags of debris to count out the number of tiles I wanted (based on the bill of materials I created, counting the number of tiles I wanted to install based on the size of the space I needed to fill). Most of the tiles were lighter-colored tiles, but I also needed some darker-colored tiles for the accent strip and the base of the tub, plus a number of bullnose tiles for the edge (and one corner bullnose for the corner piece). I separated the tiles from the drywall and put them in a bucket to soak, then scraped whatever remained of the drywall and the backing mesh from the tile and returned the tile to the bucket (along with a spot of bleach to kill of any remaining mold left over from the original water damage).

Then I mixed up the last of my mortar and applied the tiles, one at a time, to the wall. (I ended up mixing the mortar with too much water, so it was too soft, but it worked well enough.) I ended up needing to cut some of the tile to size, because the wall wasn't an exact multiple of the two-inch tiles plus the grout line. (Here I was reminded that the original tiles were two inches plus the grout line; the new subway tiles I installed were two inches end-to-end, so they were a little shorter than the old tiles, and would have been visibly out of alignment with the old tiles had I ended up installing them next to each other.)

I also put salvage tile on the front of the tub, extending the tile there out to the edge of the shower, on the space that I refinished with new backer board and waterproofing as part of the new partition at the edge of the shower.
(This tile in particular gave me trouble when the mortar cured, because the new tile was obviously not flush with the existing tile. I removed the new tile, scraped the mortar and the waterproofing away to create a more-smooth surface, then reinstalled the tiles there, along with a handful of tiles on the wall above the tub that detached from the wall when I removed the spacers. I had run out of my second, 50-pound bag of mortar (the one I used to install all of the tile in the shower), so I picked up a small tub of "repair" mortar at Stoneway Hardware for this step. When I was done, a second time, the tile looked much better, and then it was ready to be finished with grout.)
Meanwhile I finished the drywall patch above the shower (where I cut into the drywall to extend the shower head a foot above the tile) and sprayed texture on the wall, including directly on the waterproofing membrane I painted on top of the backer board above the tile above the tub. (In this picture we also see the shower door being installed; about which, more later.)

And then I painted the wall above the tile above the tub. With the drywall texture it's not totally obvious that the wall is really cement backer board, not drywall (and that the white paint I used here is not actually the same color as the off-white on the rest of the wall); but the overall effect is that it looks like a wall and it looks like it's supposed to be there (and, incidentally, we planned to have the entire bathroom painted after we moved out so my primary objective was to get the wall to look like it was painted, then the painters would cover the rest). We also see here that I've finished the tile with grout, but also that I used the white grout from the shower rather than a perfect color-match for the darker grout on the existing wall to the right; this, too, was ok because by this point we decided to get the tile refinished so the color of the grout wouldn't matter (but also the color of the tile wouldn't matter, so the strip of dark tile I extended from the wall wouldn't be visible in the final product either).

My next step would be installing the shower door — which turned out to be rather more complicated than I was expecting.
