The Sink
Started: 2019-10-05 11:30:41
Submitted: 2019-10-05 13:41:37
Visibility: World-readable
In which the intrepid narrator replaces a bathroom faucet, which proves to be considerably more involved than first anticipated
Two weeks ago, on Saturday morning, I found Kiesa in the process of removing the wallpaper in the half-bathroom on the second floor, adjacent to the dining room. The wallpaper came off easily enough, and after Kiesa washed the glue off the wall it looked like all we needed to do was paint the wall and it would look great. (This involved finding a color of paint we wanted to use, which is a project we have not yet completed, so it's another story I'm not going to tell today.)
This inspired me to replace the ugly brass fixtures with modern brushed nickel fixtures. I swung by Home Depot to pick up a light fixture and a new faucet. The light fixture was trivial to install: I installed it in about twelve minutes, then carted the old light into the garage while I figure out how to discard it properly.
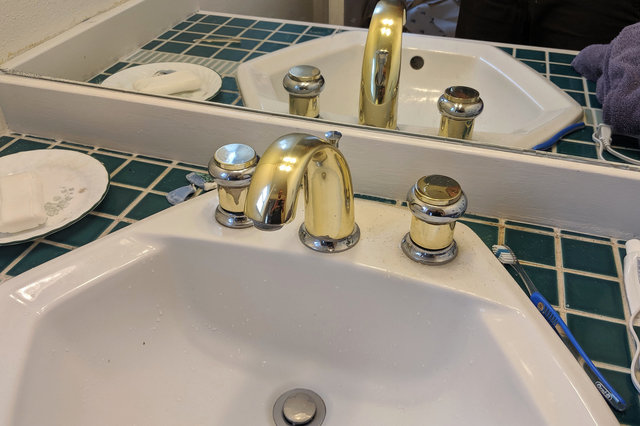
The faucet, though, was considerably more involved.
I started by turning off the water cut-off valves under the sink, disconnecting the faucet from the hot and cold water, and trying to detach the faucet from the sink. This proved easier said than done: the faucet and knobs were attached using old rusted nuts under the sink, and I couldn't get a good grip on the nut while lying on my back in the cabinet under the sink reaching up into the space behind the sink, even with my normally-adequate selection of locking pliers and other wrenches. I dropped by my local hardware store, Stoneway Hardware, and picked up a basin wrench, a tool nominally designed for reaching up behind sinks to manipulate nuts in awkward spaces under sinks like this; but the new wrench was not up to the challenge provided by the old rusted nuts under the sink.
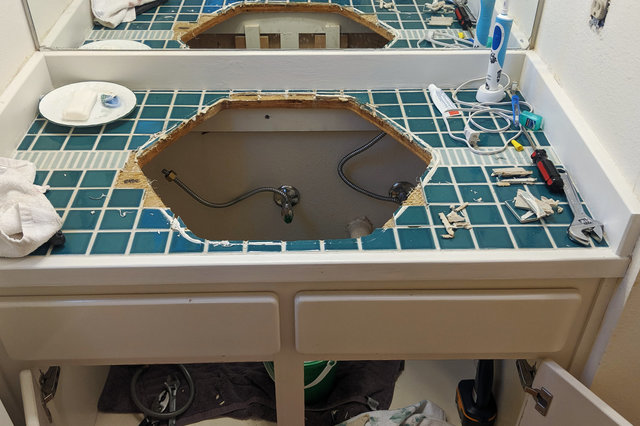
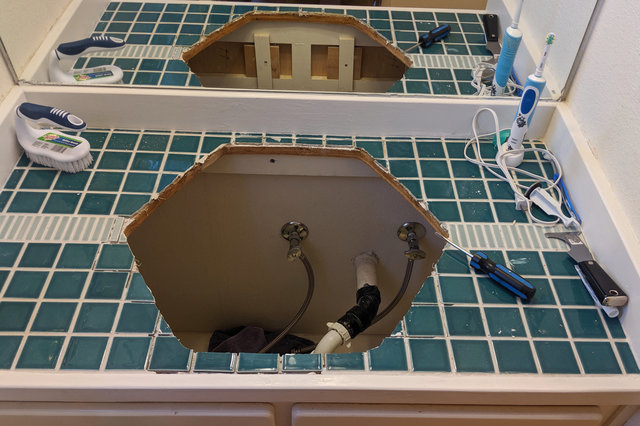
This was when I decided I needed to remove the sink entirely to get enough leverage to work the old nuts. I pried the sink away from the countertop, but in my zeal to remove the sink I ended up with some of the tiles attached to the sink rather than to the countertop. I set the tiles aside and decided I'd deal with that problem later.
I balanced the sink between two chairs, giving me a work surface good enough to remove the faucet and one of the knobs, with the help of some penetrating oil. The hot water knob, though, proved troublesome. The knob was designed with several moving parts; the cap at the top screwed into an internal shaft, and the whole thing had to be disassembled in sequence to remove the nut at the bottom of the assembly that attached the threaded pipe to the sink. I had to remove that nut in order to pull the pipe downward through the sink, because the water feed into the knob was mounted on the side of the pipe that supported the knob under the sink, and was too bulky to allow the whole assembly to be pulled upwards through the sink. It appeared, though, that the very top of the knob had been glued to the rest of the knob, and I could not get an adequate grip on the knob to unscrew the top, and in the process of attempting to unscrew the knob I had snapped one of the interior plastic parts of the valve that should have provided enough resistance to unscrew the knob.
This left me with one remaining option for removing the knob: hacksaw through the pipe under the sink, above the feed hose, so I could remove the knob through the sink. This was a good idea in theory, except that my hacksaw blade is about fifteen years old and needs to be replaced. I sawed half-way through the pipe with my old blade, then took a second trip to Stoneway Hardware. I experienced some choice anxiety in the store trying to pick between the different blades before deciding that they were cheap enough (less than two dollars each) that it was way easier to just buy all of them and sort out the details later. With the new saw blade I cut through the rest of the pipe in a matter of seconds, and finally removed the knob from the sink.
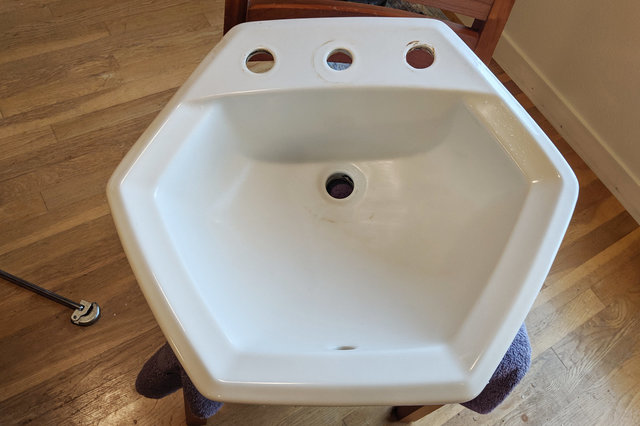
By this point my quick Sunday afternoon project had stretched into the evening. Kiesa ordered pizza for supper (a role usually reserved for me) and I turned my attention to installing the new faucet. This proved much easier: not only was the new faucet new (and therefore not rusted), it was designed with easier-to-install fittings that made attaching it to the sink trivial.
Then I remembered the tile on the countertop. I did not want to go to the trouble of figuring out how to properly reinstall the tile with the right mortar and grout and whatever, but I had a caulk gun in my hand with a nice new tube of white silicone caulk, so I caulked the tiles into position and caulked between them and it looked good enough that I was willing to drop the sink into place.

This proved to be easier said than done: if I had been able to drop the sink precisely into place and get it properly aligned the first time it probably would have worked fine (except for the part where I had caulk rather than grout between the tiles next to the sink, which I hoped no one would notice), but the sink was just bulky enough and I couldn't see all the way around it that it took some adjustment to get it right into place. This adjustment proved fatal to the tile: the tiles were only loosely attached to the counter, so they stuck to the sink rather than staying in position.
I managed to, awkwardly, push most of the tiles into their right place, but the impact was most noticeable at the top of the sink, where the tiles were clearly misaligned, and I couldn't get them to stay in the right position.

I gave up on that problem and returned to the water hook-up. The existing water hoses were showing their age and were not up to the task of being reattached to the new faucet: the hose was an integral part of the shutoff valve and the hose was built out of brittle metal and was showing signs of metal fatigue. I had encountered the same problem on the water shut-off feeding the toilet in the same bathroom and had replaced the valve and the hose; I needed to do the same thing here.
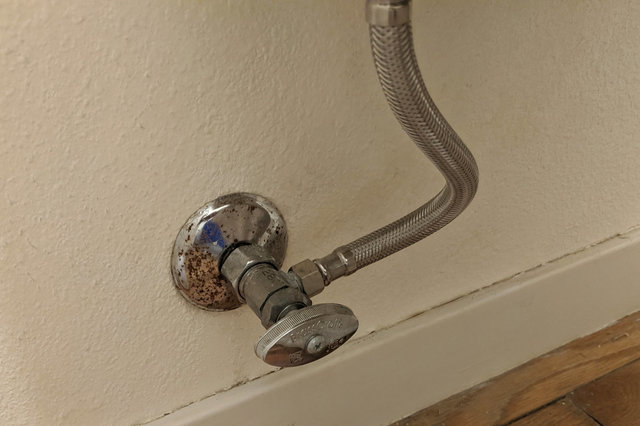
By this point it was Sunday evening and Stoneway Hardware was closed. I went to Home Depot again (my third hardware store trip of the day, my fourth in the project) and picked up two compression valves and two properly-sized hoses -- a half-hour before the store closed for the night.
The valves were connected to a 1/2" copper pipe sticking out of the drywall. To replace the valves I had to turn off the water to the house, remove the valve from the pipe, install the new valve onto the pipe (using the same compression fitting and nut from the old valve, because that was easier than trying to replace it), then having Kiesa watch for leaks in real time while I turned the water back on. All of this went flawlessly: the water ran through the faucet without any leaks, spilling beautifully into the basin like it was supposed to.
I was about to declare victory (possibly a qualified victory given the state of the tile) when I checked the drain and discovered that it was leaking. The drain pipe was not attached very well to the bottom of the sink. I tried tightening the nuts under the drain, but I couldn't get the rubber washer forming the interface between the sink and the drain pipe to sit in the right place. While I was trying to adjust the nut I dislodged the sink from the countertop again, doing further damage to the position of the tiles beneath the sink. At this point I decided I was doing negative work and I had better stop before I made a bigger mess. I left a bucket under the sink to catch the leak, cleaned up the tools in the bathroom, and let the project sit over the week.
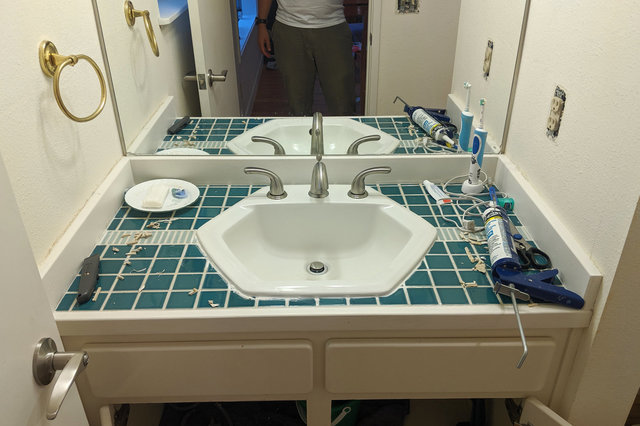
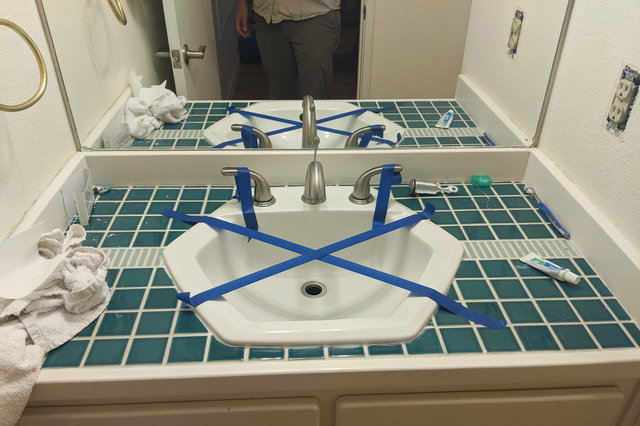
I returned to the project on Saturday committed to get it right this time. I went back to Home Depot and picked up thin-set mortar and grout to lay the tile, plus the tools necessary to apply the mortar and grout. I removed the sink, detached and cleaned up the tile and the grout, set the tile in the mortar, and let the mortar cure for twenty-four hours. It looked better already.
On Sunday afternoon, after the mortar had cured and the tiles were fixed into place, I applied grout between the tiles. With the right tool, a rubberized float designed to apply the grout, it went on easily and looked great. I let the grout cure for another twenty-four hours.

On Monday evening I checked the state of the grout and confirmed that it looked ready, so I installed the sink and caulked it into place. I attempted to avoid the same class of mistake I made earlier by letting the caulk cure in place, so it would be solid enough that I could use the sink without pushing it out of position. I marked off the sink with tape to make it obvious that although the sink was physically in place it was not yet ready to be used.
Finally on Tuesday evening the sink was properly installed and ready to be hooked up. I attached the water and turned on the sink, then looked at the drain. I didn't think I had done anything to the drain that would have improved its seal, but the drain worked fine without leaking, so I declared victory -- though I'm still a little paranoid about leaks so I haven't yet removed the bucket from under the sink drain.
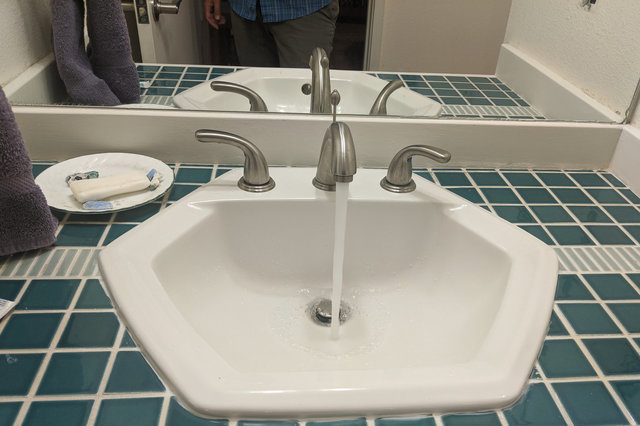
(While looking at real estate photos online I often see pictures where the faucet is running. These always seemed odd to me -- I would obviously expect the sink to work so there should be no need to prove it to me in the photo. But in this case, I think I'm justified in showing the sink with running water; I'm just not not going to include it in the house's real estate listing.)
It only took me five trips to two hardware stores over two weekends to replace the bathroom faucet, but now it's done -- and now I'm trying desperately to avoid replacing the same ugly faucets in the master bathroom.
