Pandemic home repairs
Started: 2020-07-11 22:19:57
Submitted: 2020-07-12 01:02:33
Visibility: World-readable
In which the intrepid narrator finds things to fix around the house, as a warmup to renovating his master bathroom
As the COVID-19 pandemic overtook my life, I turned to a series of home-repair projects to keep me occupied (and, I hoped, put the house in a better shape for putting it on the market). The first thing I did was replace the faucets in the master bathroom with brushed nickel, following the work I did last fall to replace the faucet on the sink on the second-floor half bathroom. Kiesa is worried that brushed nickel is going to obviously age the house (Millennial buyers — people younger than us who we're trying to sell the house to — will walk into the house and see all the brushed nickel and say "Oh that's so Gen X") but I think it's still better than the ugly original 1980s brass, especially because the original faucets were showing their age.
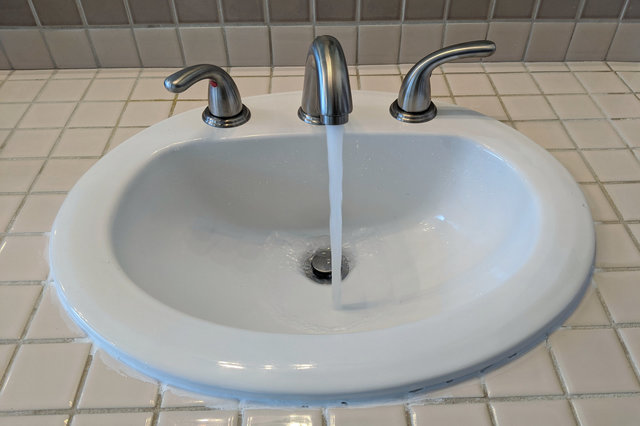
I applied the lessons I learned from the last time I tried to replace a faucet. I did have to take the sink off of the counter to in order to remove the old, rusted faucet; but I did so carefully enough that I didn't take very many of the tiles with it. And when I did need to repair the tiles, I had the mortar and grout I needed to make it look good.
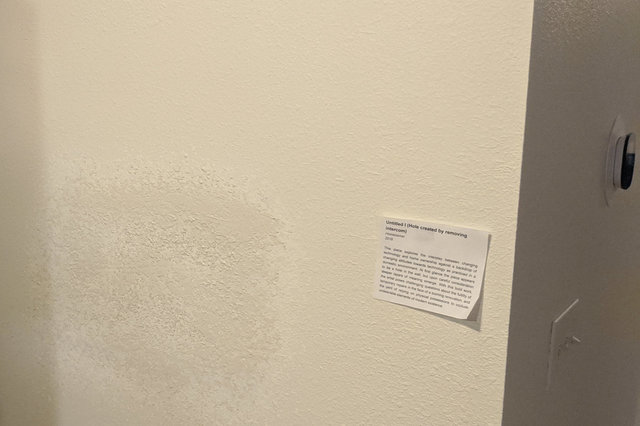
Over Memorial Day weekend I looked at the hole in the drywall where I removed the intercom base station when we bought the house and decided I should patch it myself. (This had been on the list of things we proposed to a contractor to repair, but the contractor ended up canceling early in the pandemic.) The hole was big enough that I knew I needed a better patch than the little surface patches I'd done before, so I asked the Internet (via my favorite search engine, which incidentally happens to be run by the same company I work for) for advice on how to patch my drywall, and it told me what to do.
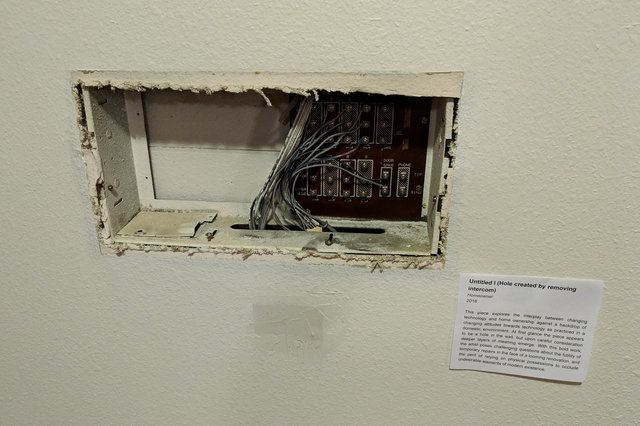
The intercom had remained partially embedded in the wall for a year-and-a-half after we moved in, partially obscured by a bookshelf, awaiting a major kitchen remodel that never materialized. I made art out of necessity, with an interpretive sign that mimicked art curator doublespeak.
My first step was to physically remove the back of the intercom base station from the wall, which proved more difficult than it ought to, because the box had clearly been installed before the drywall, and the power cable connected to the transformer (hidden under a panel at the bottom of the box) did not have enough slack to let me work the box out of the wall in order to properly cut and terminate the power cable. But at some length (with some additional damage to the drywall) I got it out.

As I worked, I felt like I should be updating my interpretive art sign as I patch my drywall. The next step was to trim the drywall to give a straight surface to match the patch; then I installed a 2x4 I had floating around the garage in the hole to provide extra support for the patch.
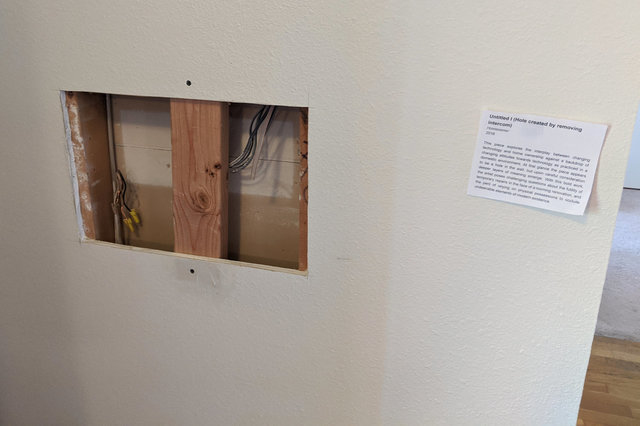
Then I installed the carefully-cut drywall patch section, and covered the edges in fiberglass drywall tape.
I posted the updated art interpretive sign on Twitter:
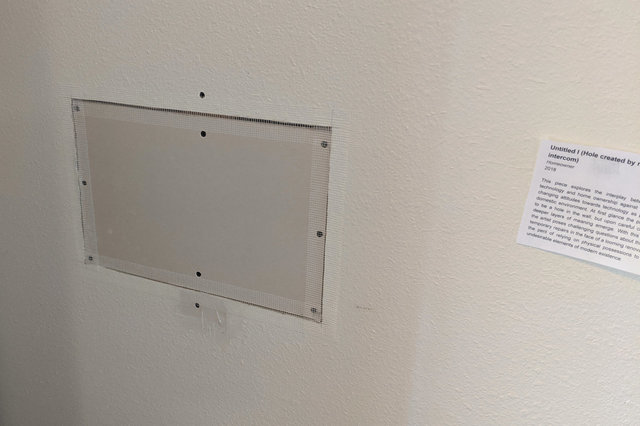
Here we see that the homeowner has applied fiberglass tape to the edges of the patch. Notice the unevenness of the edges of the tape, and the gaps between the patch and the existing wall. This suggests that the homeowner is a competent amateur following directions.
Pay careful attention to the incompletely patched hole below the large patch. We see evidence of an attempt to extract a paint sample for color matching, which was thwarted when the artist discovered the color in the dining room was different from the color elsewhere.
This bold work challenges our understanding of the permanence of art in a changing domestic environment. We eagerly await the artist's further works in this difficult media.

Then I applied spackle to the hole, and continued to feed my home-repair imposter syndrome by snarking about it on Twitter:
This update to the artist's challenging series of domestic art installations shows the artist moving into territory where they seem less confident. Notice the uneven strokes with the putty knife and the lumps of spackling left behind.
Clearly the artist is hoping to improve the appearance of the patch after the spackling dries, but it remains to be seen how successful this artistic endeavor will be.
I ended up applying a second layer of spackle after sanding the first one; then I applied drywall texture in a can, trying to match the existing texture close enough that the patch wouldn't be totally obvious.
In the summer of 1996 I spent a week on a mission trip building a house at a school somewhere in the general vicinity of Farmington, New Mexico. I ended up in the right place at the right time to get attached to the drywall finishers and helped them texture the drywall, including operating the air-powered gun that sprayed the mud onto the wall, then used the knock-down knife to flatten the texture, reducing shadows and making the texture slightly more subtle. This brief experience gave me a lasting appreciation for drywall texture (to the point where I sometimes run my hands along the texture on the drywall when I walk into a room, appreciating the craft that went into making it look effortless, and a tenuous connection to the people who did the work).
For this project, I used texture in a spray can to try to match the eggshell texture on the wall. It won't stand up to serious scrutiny, but it's adequate for my purposes. (Drywall texture is one of the many things in a house where you don't notice it unless it's wrong.)
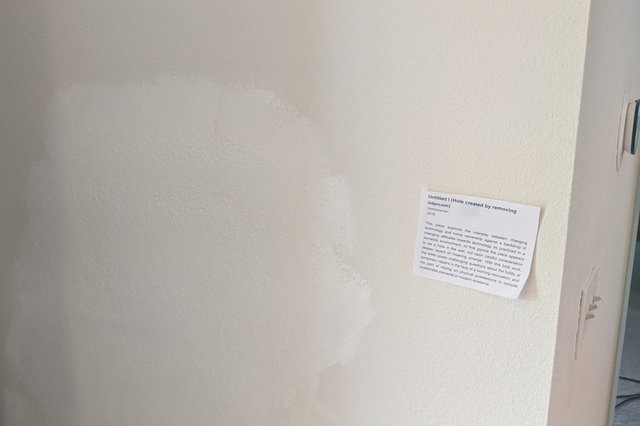
My final step was to paint the patch; but I didn't have the correct color of paint for the wall, so I used a random can of white paint I found in the garage instead.
The house came with several colors of paint on various walls, none of which I really like. Most of the living areas (including the master bedroom) are painted in an off-white color that looks fine in most light, but in direct sunlight it takes on a pallid yellow tone, with a hint of green, that looks sickly and makes me wonder if I've fallen into a Lovecraft horror story, where the sickly color of the walls is the first thing that sends me down the path to madness (explicated with voluptuous purple prose along the way). I have a good-enough color-match for this paint, which let me paint over drywall patches in most rooms, but the dining room was painted in a different color.
I allowed myself to pretend this was a deliberate artistic choice:
In this update to the unnamed artist's series of domestic art installations, we see that the artist has painted the site of the repair but deliberately chosen a different color of paint.
This bold choice simultaneously highlights the futility of home repairs while referencing the overwhelming variety of paint colors, none of which match with each other, available at retail home-improvement outlets.
Meanwhile the artist's confident choice of a single paint color — even though it appears to be an incorrect match with the surrounding paint — cuts through the Gordian knot of choice anxiety faced by artists and home-owners alike in the paint aisle as they make their choice.
This tiny repair project went well enough that it lulled me into a sense of confidence when I began to contemplate my most ambitious home-repair project to date: remodeling my entire bathroom, in the middle of a once-in-a-century global pandemic.
