Accidental project
Started: 2020-07-24 20:10:09
Submitted: 2020-07-24 23:35:34
Visibility: World-readable
In which the intrepid narrator accidently starts a massive bathroom renovation project in the midst of a global pandemic, while interviewing for a new job at Apple and preparing to sell his house and move to California
I might be able to blame my bathroom renovation project on UPS.
Saturday
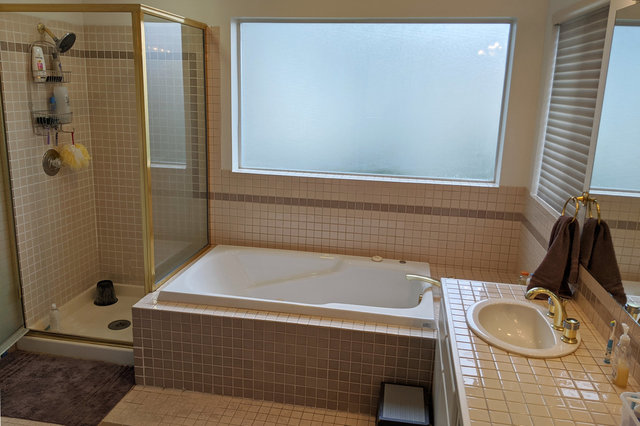
On the last Saturday afternoon in May, I looked around the house for a project, following up on my earlier home-improvement projects. I had ordered three bathroom vanity lights from Home Depot, delivered via UPS. The first one had arrived broken; the second two did not arrive at all. If they had arrived, that might have fulfilled my need for a project; instead, I found myself in my tile-covered master bathroom looking at the water damage around the shower.
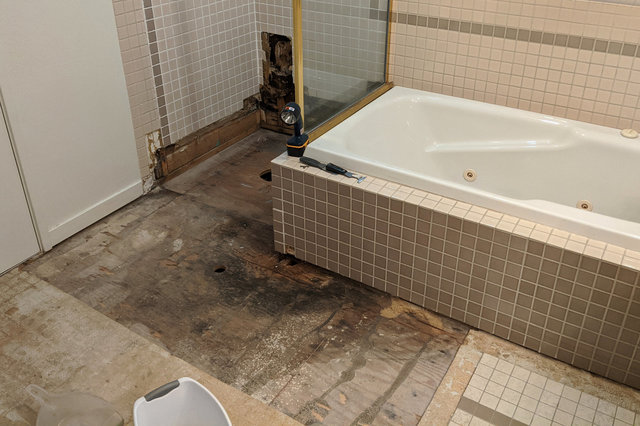
The first thing I saw was the side panel on the shower, opposite the shower head, which was obviously rusting under the bottom edge. We had taped over the bottom edge with duct tape when we moved in, but that didn't seem fit to withstand a competent home inspection. I managed to pry away the metal panel, revealing a clearly-water-damaged fiberboard panel that came away easily when I applied minimal pressure with a putty knife, along with the earthy aroma of mildew. This revealed a piece of plywood, obviously water-damaged but still strong enough that I couldn't easily remove it to see what horrors lurked behind it.

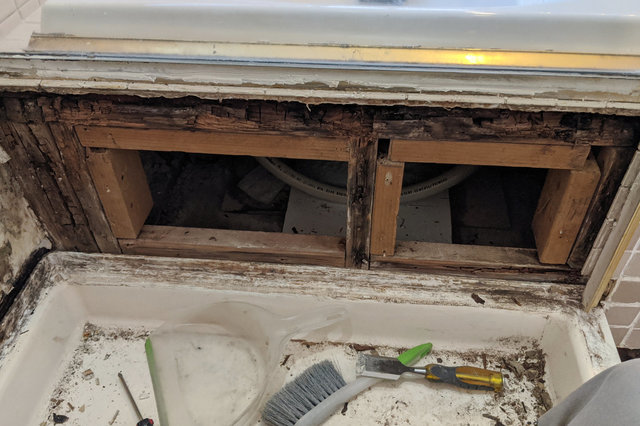
I drove to Stoneway Hardware to pick up couple of tools to help me demolish the panel: two prybars, a chisel, and a pair of rubberized work gloves. I took a break for my regular weekend video call with my family of origin (this week was Novel Coronaconference XII), then ate supper, and finally returned to the shower. I pried the plywood off, letting me look under the tub, revealing obviously-water-damaged support beams (and clear evidence of more-recent patches — the undamaged beams installed to shore up the old beams, without removing the original rotten beams, instead letting the old beams succumb to dry rot).
This was obviously a water damage problem, and if I was serious about removing and repairing the water damage in the bathroom I needed to remove the beams. But I wasn't yet past the point of no return: I could, plausibly, figure out how to replace the panel and at least the damage there wouldn't be obvious — but I'd still have damage elsewhere around the shower: on the floor in front of the shower, and on the back wall of the shower.
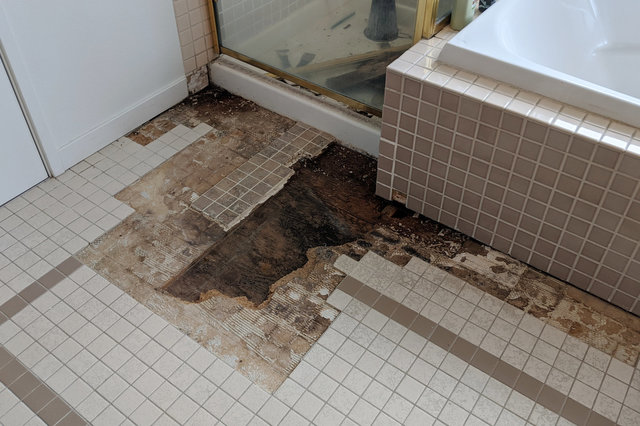
This didn't seem to be the obvious source of any leaks, though; the panel I'd removed had only been rusting away at the bottom, at a point where any water that leaked through would probably be caught by the shower pan. I started poking at the tile on the floor in front of the shower, at the point where the floor had become noticeably soft, indicating water damage; the tile came away easily, revealing damp subfloor the consistency of cheese, soft and spongy to the touch, accompanied by a strong aroma of mildew.
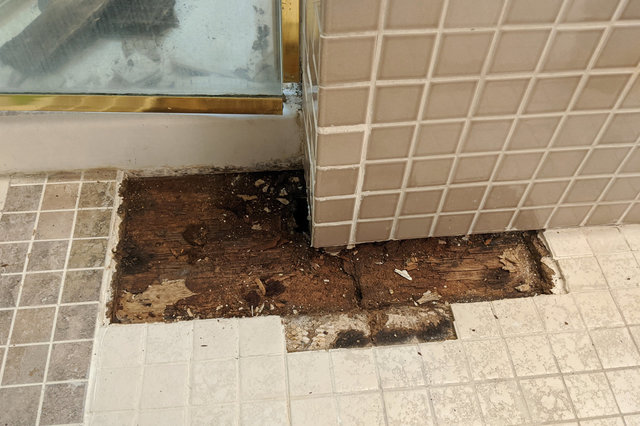
This was my practical point of no return: once I started removing tile from the floor it'd be difficult to replace it and still make it look decent (never mind that the subfloor was still wet). I gave the subfloor an experimental poke with a screwdriver and successfully punched a hole all the way through into the space between the joists.
At this point I had a vague idea of the scope of the project I was undertaking: I'd need to remove the tile on the floor, remove and replace the water-damaged subfloor, and also tear down the water damaged wall behind the shower and rebuild that as well — and somehow make it all look good enough next to the existing tile on the rest of the bathroom so that I wouldn't have to replace all of that as well. The "make it look good" part was where we'd bogged down in the initial version of the project, when we thought we'd have a contractor working on it; and here I was, undertaking the project myself, in the middle of a global pandemic, with only the vaguest idea how to do any of the things I was about to undertake.
I continued chipping away at the tile in front of the bathtub to try to get an idea of how far the water damage went. I removed all of the tile in front of the bathtub and found the point where the water damage stopped. This suggested that I could reuse some of the subfloor, as long as I could get new subfloor that approximately matched it in height; though I'd have to remove all of the tile eventually to install a new floor surface. (By this point we'd discussed options for the floor and come up with vinyl plank, an easy-to-install manufactured floor with fake wood grain that actually looks ok.)
Sunday
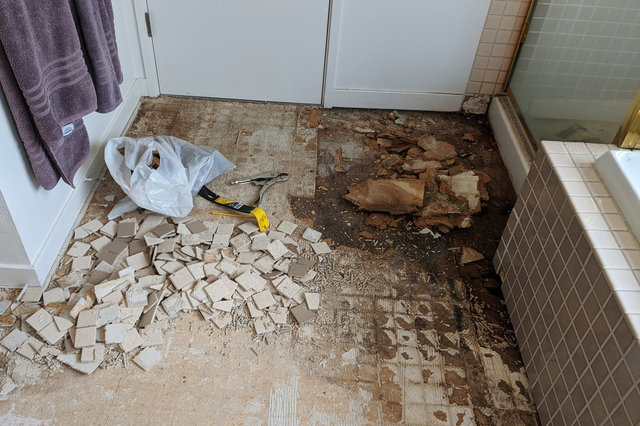
On Sunday morning I returned to my demolition project. I discovered that the board that the tile was sitting on was an extra half-inch thick layer of fiberboard that was glued on top of the subfloor, functioning as an underlayment board. In some places the underlayment was soft enough that I could chip it away with a few deft strokes of a pry bar; in others it required more effort.
I alternated chipping away at the tiles and chipping away at the underlayment until I had exposed all of the water-damaged underlayment and a good chunk of the underlayment itself. Here I got a good look at the subfloor, which was obviously damaged and would obviously need to be replaced as well.
(Along the way I discovered that the modern practice is to use cement backer board for tile, whether it's on the floor or on the shower wall, but the practice when this house was built in 1991 was to use fiberboard on the floor and greenboard (a sort-of water-resistant drywall) behind the shower. This probably exacerbated the water damage problems, because neither the fiberboard nor the greenboard were adequately waterproof, and the boards were damaged by the water; but it probably made my demolition work easier.)
I took a trip to Home Depot to buy OSB ("oriented strand board", the newest manufactured wood product that fits somewhere between plywood and fiberboard, and is strong enough to be used as subfloor) to use to rebuild the subfloor and underlayment. I lashed the four foot by eight foot boards to the roof of Motoko, and when I got back to the house and unloaded the boards into my garage, my garage immediately filled with the smell of the boards: a pleasing combination of pine wood and glue that made me think of new basements in Colorado.
I got back from Home Depot just in time before a city-wide curfew came into effect at 17:00, the mayor's reactionary attempt at cutting off the Black Lives Matter protests that sprang up in Seattle, along with the rest of the country, in the aftermath of George Floyd's death under the knee of a Minneapolis police officer. The mayor's FAQ had a number of interesting questions but lacked the most salient ones I could think of, including "Is this actually legal?" and "Are you sure it's a good idea to address a protest against well-documented police brutality by giving the police more power to rough up and arrest people?" and "Why does this curfew apply to the entire city (including, eg, Wallingford, where I can look out my window and there's obviously no riot here) when the protests are isolated in a couple of neighborhoods far from me?" and "I need to eat supper, can I order pizza?" (Most of these questions remained unanswered, but the answer to the last question was yes.) The curfew failed to have any obvious effect on the protests (the cops abandoned the East Precinct and protestors set up the Capitol Hill Autonomous Zone (CHAZ, which sounds like someone I went to high school with) and then quickly renamed it to Capitol Hill Organized Protest (CHOP)) or on my life (I ordered pizza, and otherwise stayed in my house all day because there was still a global pandemic). (It did occur to me to wonder how many people on the plywood aisle at Home Depot were preparing to board up their windows ahead of protests.)

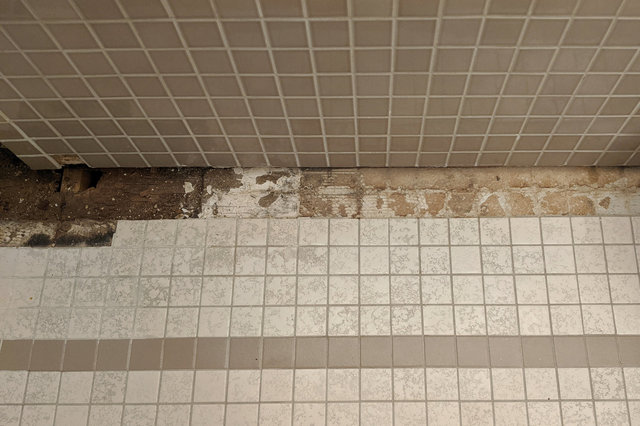
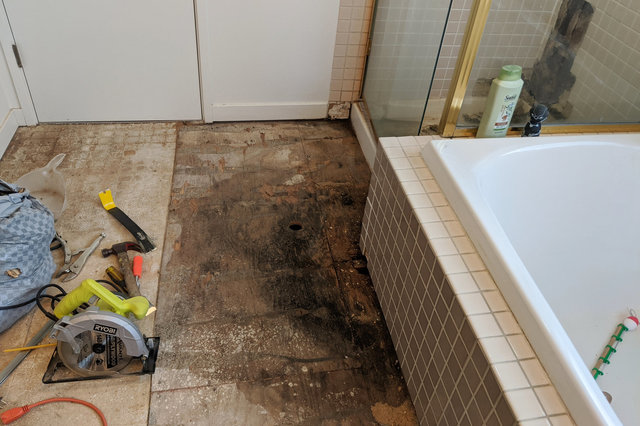
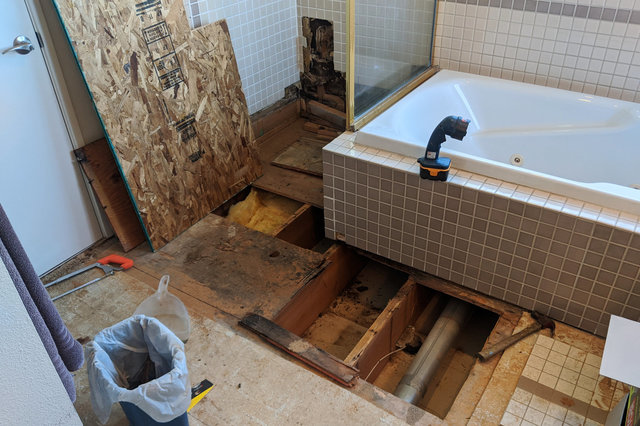
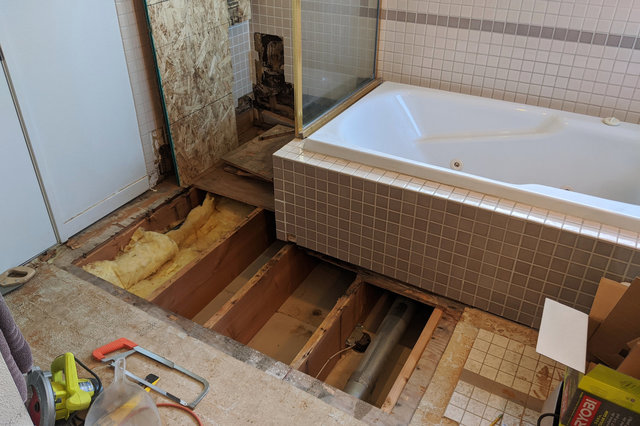
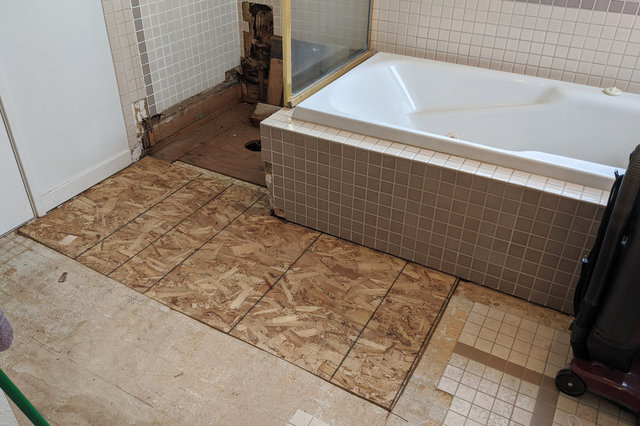
Once I had all of the tile removed, I pulled my circular saw up from the garage and used it to cut through the underlayment, making a relatively neat straight line where I could replace part of the underlayment and leave the rest alone. In the picture below you can clearly see the extent of the water damage in the subfloor, along with an exploratory hole I cut through the subfloor with a hole saw, just to see what the void space between the floor joists looked like.
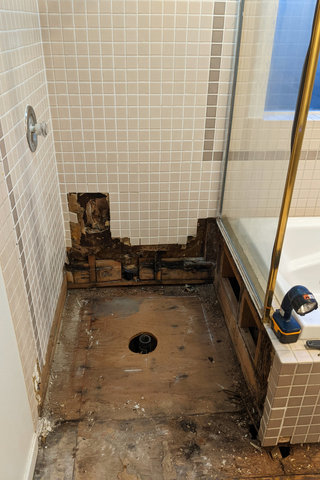
With the bathroom floor in ruin, I decided to go for broke and see what horrors lurked in the wall behind the shower wall. The tile on the shower wall was obviously bulging in two places, portending water damage that would have to be replaced. I poked at the tile and it came off easily in my hands, exposing rotten greenboard, as well as evidence that the tile had been removed and replaced previously, apparently to clean up an earlier spot of water damage in the shower.

I continued my exploratory demolition and discovered that the rot was consistent on the back wall of the shower, but did not extend very far onto the front wall of the shower (the interior wall where the shower head sat).

I wanted to look under the shower pan to see how far under the shower pan the rot in the subfloor went, and I was pretty sure I'd need to replace the shower pan anyway, so I pulled up the shower pan (which required removing the shower door in the process, which I was pretty sure was also a write-off). This exposed more rot in the wall behind the shower, but minimal rot in the subfloor under the shower pan.
By the time I stopped working on the bathroom on Sunday night, it was 21:30. I had exposed all of the water-damaged subfloor, so my next step was to remove and replace the subfloor and then the underlayment.
Monday
With the shower out of commission for the immediate future, Kiesa and I started using the ground-floor shower, which our au pair Sharon usually has to herself. I took Monday afternoon off work and returned to my master bath project. I started using my circular saw to cut into the subfloor, but it wasn't working as well as I expected: it would scrape and whine, making a lot of smoke and refusing to cut in a straight line. I tried adjusting it, however well I could (including consulting the manual, which wasn't much help) and eventually decided that the blade was misaligned in some subtle way that I couldn't fix, so the best thing to do was buy a new saw. (This was the cheapest circular saw at Home Depot in 2016 when I needed to cut a butcherblock countertop to install a dishwasher in my rental house in San Francisco; I bought another copy of the same saw. When I first used the saw it was my only power tool that scared me; by the time I finished with my bathroom project I'd used the saw so much I gained enough confidence that it no longer scared me, though I still appreciated its destructive power.)
The new saw cut through the subfloor like butter, the way it was supposed to, a vast improvement over the old saw. I cut the OSB into the irregular shape I needed to fit the hole where I removed the subfloor, then quickly demolished the rest of the subfloor. I ended up with an awkwardly-shaped space under the edge of the tub, where I didn't have the right leverage or clearance to easily remove the subfloor. (I considered getting a reciprocating saw to help with the demolition of the subfloor, but I thought I should limit myself to no more than one new power tool per day.)
I cleaned up the drywall under the floor, even though no one will see it. I walked carefully on top of the open floor, trying to avoid stepping between the joists onto the drywall ceiling below. Not only would that be unpleasant, I'd also have to repair the footprints in the ceiling.
I managed to avoid any drywall catastrophes in the brief time the subfloor was open. I had to trim my new piece of subfloor to get it to fit; but once it fit I glued it to the joists and nailed it into place, using the oldest tool I own: a claw hammer my parents bought me as a child, possibly to distract me from my father's own tools, which I used to play "construction worker" in the back yard with scraps of wood. Nailing the subfloor into the joists, with big clean strokes of the hammer, reminded me of that part of my childhood, giving me the impression that my whole life had been leading up to this one moment fulfilling my childhood dreams.
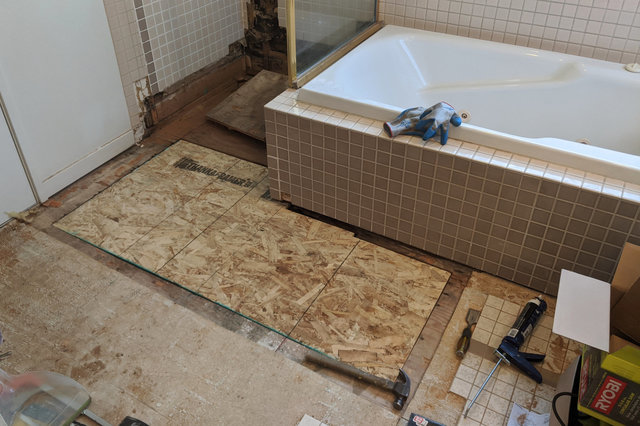
I cut a second piece of OSB to replace the underlayment, matching the existing underlayment well enough that I could install a new floor on top.
With the subfloor replaced, I turned my attention to demolishing the rest of the shower, trying to find out just how deep this rabbit hole goes — and that's a story for later.
