The end of the project
Started: 2020-08-03 19:22:40
Submitted: 2020-08-03 21:26:09
Visibility: World-readable
In which the intrepid narrator finally wraps up his epic pandemic bathroom-remodel project
The last step in my bathroom remodel was to replace the floor under the toilet.
When Kiesa removed the tile from the bathroom, the underlayment she exposed around the toilet was obviously water-damaged (and, possibly, still damp). The floor smelled of the sharp earthy scent of mildew, which I took as a bad sign. This meant I needed to remove at least the underlayment and possibly the subfloor to fix the water damage. When I laid down new floor for the rest of the bathroom, I left the toilet alone because I needed to dedicate an entire day to the project to make sure I did it right (and to minimize the wall time that the toilet would be out of service while I removed it, replaced the underlayment, and laid the new floor).
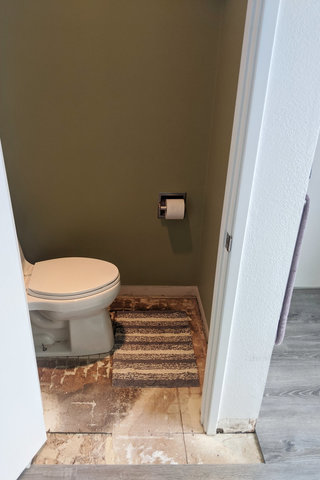
I set a small area rug on the floor in front of the toilet and otherwise left the toilet alone until the next Saturday, when I had enough time to work on the bathroom.

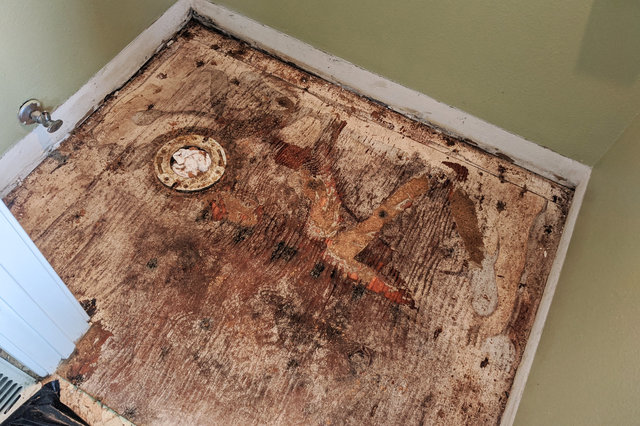
My first step was to remove the toilet; this proved to be easy enough with Kiesa's help. (I noticed that the water shutoff valve behind the toilet had been replaced, and that the feed pipe attached to the toilet still bore an Ace Hardware label; I assumed this meant the original valve, prone to metal fatigue, had leaked and had been replaced via a trip to Wallingford's other hardware store. This meant I didn't have to replace it myself (as I had in so many other places in the house), and also suggested a possible source of the water damage under the floor.)

I set to work removing the water-damaged underlayment, and it proved relatively easy work given the water damage (along with my new oscillating tool, which helped out in some places where the adhesive attached the underlayment to the subfloor). By the time I was done removing the underlayment, I was pleased to see that the subfloor looked intact and relatively undamaged, so I sprayed anti-mold spray on everything and proceeded to cut a new piece of oriented strand board to function as the replacement underlayment.
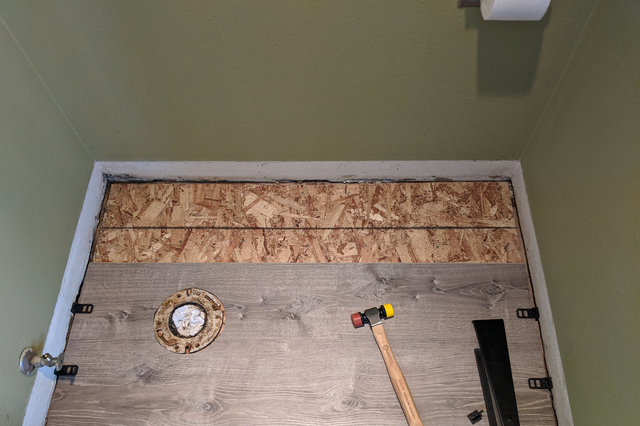
I started out by cutting the OSB into one piece to cover the entire floor of the little toilet room, but then I realized I needed to get the toilet flange through the board (and the toilet flange was permanently attached to the drain pipe, and sufficiently undamaged that I could reuse it). I cut the board in half, using the center of the drain pipe as my center point, and then used my jigsaw to cut out a circle for the drain pipe. (The jigsaw was the last power tool I owned that I hadn't yet used on the bathroom project. I assume it was feeling left out until now.)

Then I began installing the vinyl plank floor in the toilet room, connecting to the floor I'd already installed in the rest of the bathroom. Because the room was so small I spent most of my time cutting boards (and running up and down two flights of stairs to the driveway, where I had set up my sawhorse), compared to actually placing the plank in the right position. When I cut out the hole in the plank to accommodate the toilet flange (using my jigsaw again) I misjudged the position of the hole and ended up with it offset by two inches. This was more than enough to be visible under the side of the toilet, so I had to discard that plank and try again with a new one.
I dropped the last two planks in place and then declared victory on the floor (and took a break to eat supper).

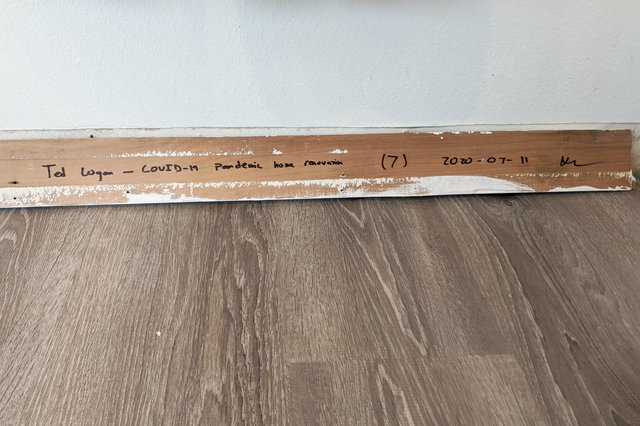
I installed the baseboards around the toilet room; and then, on the last baseboard I installed, I took a moment to sign and date it, memorializing the time I spent on this project and the circumstances under which I undertook it, before nailing it to the wall. I don't know who will see this or when — maybe in five or ten or twenty or fifty years when someone decides to remodel the bathroom, or maybe never if there's a fire or the house is demolished. I hope someone sees it, some day, and they'll appreciate or curse the work I did.
My last task for Saturday night was to paint over the nails on the baseboards and caulk the gap between the baseboard and the wall. Then I took the rest of the night off to play a board game with Calvin and Kiesa.
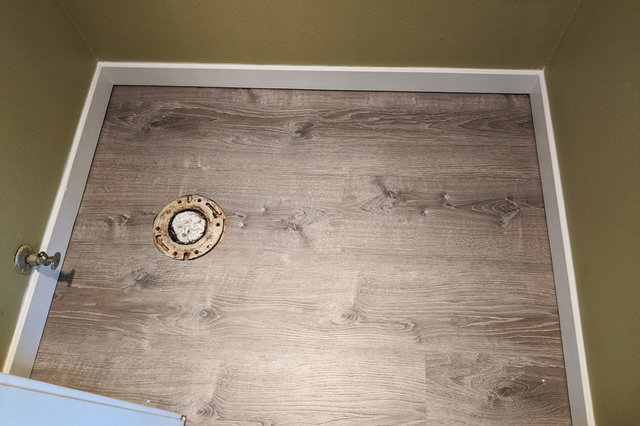
I enlisted Kiesa's help on Sunday morning to install the toilet back where it was supposed to be, then bolted it to the flange and installed little toilet bolt covers for a finished look (improving on the previous state, in which the bolt lacked covers, so it was just a bare bolt sticking up into the air on the base of the toilet).

That wrapped up the floor and most of the baseboards, but with days remaining before the movers were scheduled to come I turned my attention to the mountain of debris gathering in the garage. I took out the seats in my Rav4 and loaded the trunk full of construction and demolition debris: tiny useless pieces of wood, scraps of tile, dried mortar, scraps of cement backer board, broken pieces of vinyl plank flooring, pieces of the shower door I demolished. I filled up my car before I got to the bottom of the pile, where the broken tile and disintegrating drywall and water-damaged subfloor sat moldering on the floor of my garage.
I drove to the North Transfer Station, conveniently located around the corner from my house in Wallingford, and found a long line of cars and trucks waiting patiently on the street on the Sunday afternoon, when everyone else was wrapping up their weekend projects and swinging by the transfer station to throw stuff away. I ended up waiting for forty-five minutes for my chance to pull onto the tipping floor, back into the space assigned to me, and add my 520 pounds of debris (according to the gross and tare weights taken before and after) to the mountain of trash inside.
I returned to the transfer station on Monday afternoon, when I'd run out of things to do on my last week of work. The last of the debris took up less space in my car, but weighed more: 700 pounds net, according to the transfer station's scales, probably because it included more of the old tile from the bathroom. I swept out the garage and suddenly there was enough space to move in the garage, without the debris and construction supplies that had been piling up for the last six weeks.
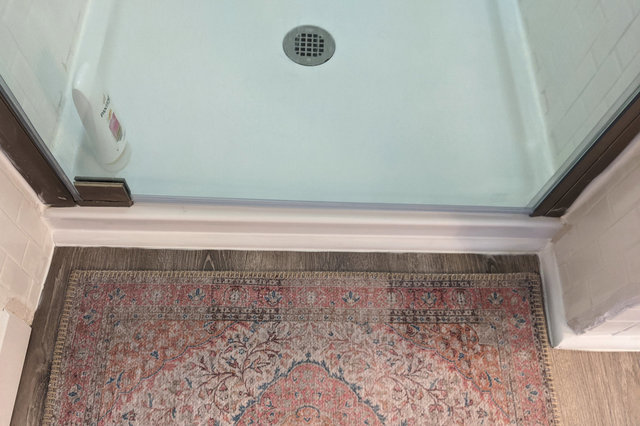
The last thing I did was install a quarter-round baseboard at the bottom of the shower and tub, covering the expansion gap at the edge of the floor. To accommodate one row of protruding tile (where the tile stuck out further than it should because it was the last row of salvage tile I'd installed) I used my oscillating tool to cut out a notch in the back of the quarter-round board.

I used silicon caulk to seal the top and bottom of the quarter-round baseboard, then covered a couple of extra cracks with grout, filled and painted the joint between the baseboard sections — and then I was done, six weeks after undertaking my accidental bathroom remodel project in the midst of a global pandemic, with only days to spare before the movers came to pack up all of our stuff and move back to California.